If you've been reading my blog, you may have noticed that I love elephants. I've already done a couple of cards that feature them. When I found this crochet pattern a few weeks ago, I just knew I had to give it a whirl!
This little guy took me about a week. I don't typically mind crocheting in the round, but this pattern uses a continuous round or a spiral, instead of separate round rows. When I do this again, I think I'll make the rows separate. It's easier for me to follow and will make it easier to attach the legs at the end. I had to reattach the left leg twice because I just couldn't get it lined up with the right, even though I was in the "same" row. I may also try going up a hook size or two. Because of the stuffing, I had to keep the stitches really tight, which got to be kind of tortuous on my hands after awhile. And the tight stitches combined with rounds that were only 8 stitches to begin with on such a small hook made it almost impossible to hold! LOL Overall though, I'm pretty pleased with how it came out and he's got a little place of honor sitting on my Big Shot shelf.
Showing posts with label Gifts. Show all posts
Sunday, July 1, 2012
Sunday, June 17, 2012
Father's Day Goodies
Just wanted to share what my son and I created for my husband for Father's Day.
The other night, my son and I wandered around our neighborhood to find some good photo opportunities. We took along two pieces of cardstock and a black Sharpie and I wrote the letter d on one and the letter a on the other. I took a series of photos of him in various spots holding each sign. Once we got home, I uploaded them all and used Walgreen's photo site to create two 5x7 photo collages where I arranged the photos to spell out dad. I did absolutely zero editing to the photos besides changing some to black and white. I love Walgreen's photo services - they almost always have a coupon code and it winds up being just as cheap as printing them yourself. While at Walgreen's to pick them up, I also found these gorgeous matted shadowbox frames to use for the pictures and they were only $5.
In addition to these two prints, I also have a large 11x14 collage of my favorite three shots that will be coming later this week. My local Walgreen's doesn't have the equipment to print that big in store.
Of course, in this house, no gift is complete without a card and I had my son help with that too. Using just a cheap set of watercolors, I painted the bottom of his feet and had him step on a piece of cardstock. The watercolor washed right off with no staining, but still left a good impression of his foot. I wanted to use a recordable card SU! had available for awhile. It's a 4 1/4x5 1/2 card and my son's foot is now bigger than that! So I had to make the card front a little bigger than the inside. I trimmed off as much as I could, although part of his other foot is still visible as well as a misplaced toe, but I kind of like how it balances out the card. I mounted it on a piece of Pacific Point and attached that to the front of the card.
Once my son recorded a message of "Happy Father's Day!" I printed out this poem that I saw on a project kit in Oriental Trading and attached that to the inside. The punched start marks where you need to push to make the recording play. You can see some of the speaker and buttons through the white paper but I didn't want to put anything too heavy over it and mess up the sound.
The other night, my son and I wandered around our neighborhood to find some good photo opportunities. We took along two pieces of cardstock and a black Sharpie and I wrote the letter d on one and the letter a on the other. I took a series of photos of him in various spots holding each sign. Once we got home, I uploaded them all and used Walgreen's photo site to create two 5x7 photo collages where I arranged the photos to spell out dad. I did absolutely zero editing to the photos besides changing some to black and white. I love Walgreen's photo services - they almost always have a coupon code and it winds up being just as cheap as printing them yourself. While at Walgreen's to pick them up, I also found these gorgeous matted shadowbox frames to use for the pictures and they were only $5.
In addition to these two prints, I also have a large 11x14 collage of my favorite three shots that will be coming later this week. My local Walgreen's doesn't have the equipment to print that big in store.
Of course, in this house, no gift is complete without a card and I had my son help with that too. Using just a cheap set of watercolors, I painted the bottom of his feet and had him step on a piece of cardstock. The watercolor washed right off with no staining, but still left a good impression of his foot. I wanted to use a recordable card SU! had available for awhile. It's a 4 1/4x5 1/2 card and my son's foot is now bigger than that! So I had to make the card front a little bigger than the inside. I trimmed off as much as I could, although part of his other foot is still visible as well as a misplaced toe, but I kind of like how it balances out the card. I mounted it on a piece of Pacific Point and attached that to the front of the card.
Once my son recorded a message of "Happy Father's Day!" I printed out this poem that I saw on a project kit in Oriental Trading and attached that to the inside. The punched start marks where you need to push to make the recording play. You can see some of the speaker and buttons through the white paper but I didn't want to put anything too heavy over it and mess up the sound.
Wednesday, May 16, 2012
M.I.A.
In the last couple of days, a few people have either asked when I'm going to update this blog or simply pointed out how slack I've been where updates are concerned. My main response was surprise and shock that anybody had noticed. There are a million excuses I could give, none of which are very good, but I got lazy at the very end of April over the weekend of my birthday, then I just enjoyed the quiet peacefulness of spending the evenings with my family instead of stressing over what I would create for the blog.
That's not to say I haven't been getting my craft on over the last couple of weeks. I've discovered the website Ravelry, which is a knitting/crocheting community, filled with oodles of patterns for practically anything you can think of. So my evenings as of late have been spent with my family and my crochet hooks. Here are some examples of what I've been up to...
This is a ruffle scarf I made out of some leftover yarn from a baby afghan I made a couple years ago. Since it was baby yarn, it's super soft, warm and snuggly.
I found a pattern for this headband on Ravelry and loved the look of it. I've modified mine slightly though. In the original design, the headband was meant to tie in the back, under the hair. I hate headbands that do that because I have such thin, fine hair that I always wind up with a bump sticking out at the base of my neck. So I played around and used some single crochet stitches to hold the bands together at the bottom and it's hidden by my hair but lies flat against my head. Meanwhile, the original design of the flower had an extra row of double crochets in the center so it was HUGE -like the size of my entire head. I couldn't handle that, so I knocked out that row and readjusted the measurements to make it fit.
Isn't this the cutest little thing? It's a Chapstick holder! What a great and useful little way to use up scraps of yarn and spare buttons. Notice I used a Stampin' Up! button!
I haven't completely ignored my paper crafting. These are the boxes we created at my May stamp club a couple weeks ago. This is the last month of the current Stampin' Up! catalog, so we made these out of retiring cardstock and stamps. The boxes actually fold up just like a pizza box. I added the belly bands for a little pizzazz.
These little pouches are what started my crochet kick. I needed a little case to carry my phone around in school without it being obvious on the days I wear clothes without pockets. So I found a couple of different patterns online to try. So far, I think the one on the left is my favorite. I may try a few more though before deciding for sure, just because I'm having so much fun!
That's not to say I haven't been getting my craft on over the last couple of weeks. I've discovered the website Ravelry, which is a knitting/crocheting community, filled with oodles of patterns for practically anything you can think of. So my evenings as of late have been spent with my family and my crochet hooks. Here are some examples of what I've been up to...
This is a ruffle scarf I made out of some leftover yarn from a baby afghan I made a couple years ago. Since it was baby yarn, it's super soft, warm and snuggly.
I found a pattern for this headband on Ravelry and loved the look of it. I've modified mine slightly though. In the original design, the headband was meant to tie in the back, under the hair. I hate headbands that do that because I have such thin, fine hair that I always wind up with a bump sticking out at the base of my neck. So I played around and used some single crochet stitches to hold the bands together at the bottom and it's hidden by my hair but lies flat against my head. Meanwhile, the original design of the flower had an extra row of double crochets in the center so it was HUGE -like the size of my entire head. I couldn't handle that, so I knocked out that row and readjusted the measurements to make it fit.
Isn't this the cutest little thing? It's a Chapstick holder! What a great and useful little way to use up scraps of yarn and spare buttons. Notice I used a Stampin' Up! button!
I haven't completely ignored my paper crafting. These are the boxes we created at my May stamp club a couple weeks ago. This is the last month of the current Stampin' Up! catalog, so we made these out of retiring cardstock and stamps. The boxes actually fold up just like a pizza box. I added the belly bands for a little pizzazz.
These little pouches are what started my crochet kick. I needed a little case to carry my phone around in school without it being obvious on the days I wear clothes without pockets. So I found a couple of different patterns online to try. So far, I think the one on the left is my favorite. I may try a few more though before deciding for sure, just because I'm having so much fun!
Saturday, April 21, 2012
Buttons 'n' Brads
The main elements in this bracelet, the buttons and brads, are all Stampin' Up! products! The brads are from the Antique Brads collection and the buttons are from the Button Bouquet collection. Both have just been kind of lying around. I'm not sure why I don't incorporate these things into my cards more often, but it was a lot of fun making the bracelet out of them. Obviously, all I added were some gold jump rings and a clasp. I did have to do a little work to the brads though. The openings on the one side were too small for a jump ring. Fortunately, I was able to use the small file from my SU! distressing kit to enlarge the opening enough for a medium jump ring.
Wednesday, April 4, 2012
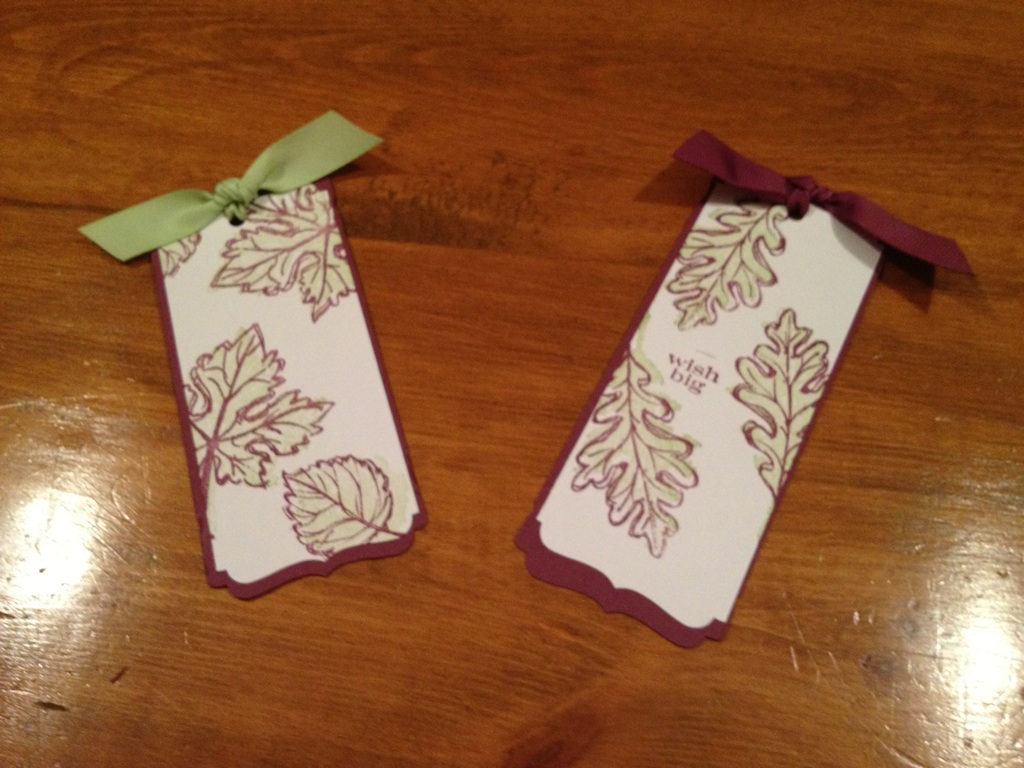
Stamp Club Bookmark
I actually took a couple projects from last week and combined them to to come up with these bookmarks for tonight's stamp club project. I swapped out a true violet for Rich Razzleberry which is a bit more red-violet.Supply List
Stamps: Gently Falling (Holiday Mini 2011), Perfect Pennants
Cardstock: Whisper White, Rich Razzleberry
Ink: Certainly Celery, Rich Razzleberry
Accessories: Decorative Label punch, 5/8" Rich Razzleberry ribbon, 5/8" Certainly Celery ribbon
Tuesday, April 3, 2012
Finally
Been trying to make this necklace for awhile. I love the way these green stones look with the small purple ones. I wanted to do a necklace in my typical style, using wire to string a few beads, make a loop at each end and loop it through the next piece. Unfortunately, the only wire I had that would fit through the purple beads was so thin that the loops wouldn't support each other. The easy solution to this would be wire wrapping, which is what I ended up doing at each end of the long strand by the clasp, but I'm not that good at wire wrapping yet. Hopefully I can get better with some more practice!All of these stones came from the Smoky Mountains and I'm very excited to be going back there next week. We're not sure if the cabin we've rented has internet access, so the blog may be going on hiatus next week. Hopefully I'll get some crafting done on my vacation, but if not, I'll double up on posts and projects until I catch up.
Friday, March 30, 2012
Showstopper
A former student of mine attends our local governor's school for the performing arts. She is a senior and has a starring role in the school's spring musical. This weekend is one of the final times she'll take the stage as a student of this school and we'll be attending the performance tomorrow night. She's like a daughter to me and we're pretty close to the entire family - her mother works with me and my husband, and her uncle is our insurance agent! So I had to do something special for her to give to her at the performance tomorrow night. I wanted to make something with stars or musical notes but, of course, I didn't have any of those in my 8000 tons of beads that are around. I did have these flower beads though and combined them with the crackled white and clear crystal beads. I like the shimmery overall effect and it's neutral enough that it could be worn with just about anything!
Thursday, March 29, 2012
Boxes Boxes
You can never have too many boxes. I'm one of those people who loves to put stuff inside of boxes. I have so many little boxes, caddies, and tins on and in my desk at work and at home to hold all those little odds and ends. This is a quick and easy box made using the Scallop Envelope die for the Big Shot. I cut out four envelopes and folded them on the score lines. The fancy scalloped edge got folded to the outside for contrast and all the other pieces were folded in. I cut off the side tabs on two of the envelopes, then used the tabs on the other two envelopes to attach the envelopes around the side to make a square. Then I overlapped the big flaps on the bottom. Depending on the paper you use, these could make very quick little Easter baskets. You can attach a strip of paper or some ribbon to make a handle.
Supply List
DSP: Tall Tales (retired)
Accessories: Big Shot, Scallop Envelope die
Sunday, March 25, 2012
Christmas Craft is here!
Sometimes things definitely look a lot better in my imagination! I found this plastic wine goblet on clearance a few weeks ago and picked it up, thinking I could do SOMEthing with it. So a couple days ago, I was digging through my vellum when I found this vellum with the white snowbursts in it and decided to use that in my cup for a Christmas craft. I tore it into pieces and used Modge Podge to apply it to the inside of the cup. I guess the vellum was a little darker than I realized, especially when layered. Still, I think this will be pretty with a battery operated tea light inside of it. Hard to see in the picture but the ribbon has silver sparkly snowflakes on it.Supply List
Plastic cup, Modge Podge, vellum, ribbon
Saturday, March 24, 2012
Saturday Night Twofer
Yep, I know I missed last night. For the third Friday in a row, we had free tickets to Arena Racing USA in Richmond. That means we get home for work, change, throw some snacks and juice boxes in a bag for the boy, and head to Richmond. The races last for about 3 hours and we got home at midnight. The last two Fridays, I was able to post stuff I had made in my classroom during the day, but I spent all of my free time yesterday coming up with a new application for my yearbook staff applicants. So technically I did create SOMETHING. :-)I went ahead and made two goodies for today to make up for yesterday. The first thing I made was the card. I love this stamp set, Trendy Trees. I got the idea for the box around the stamped image from another card I saw online. I drew the lines freehand, using a scrap of cardstock as a "ruler" but I didn't want my lines completely uniform.
The second thing I made was the bookmark. I've seen a lot of demonstrators using their punches in ways I hadn't thought of, by pulling only part of the cardstock through the punch. I used the decorative label punch to make the fancy edges of the bookmark.
Supply List
Stamps: Trendy Trees, Pines and Poinsettias (2011 Holiday Mini)
Cardstock: Pretty In Pink, Wild Wasabi, Very Vanilla
Ink: Pretty In Pink, Wild Wasabi, Soft Suede (I used markers since these were small images)
Accessories: Decorative Label punch, Chocolate Chip scalloped polka dot ribbon, stapler
Thursday, February 9, 2012
Love Lollipop
This is pretty much straight up scraps. I took a scrap of Rose Red, folded it in half, and punched it with my heart punch, leaving just a little bit of the fold inside of the heart before I punched so I'd get a folded heart instead of two separate hearts. On the inside heart, I punched two holes about half an inch apart to thread the lollipop stick through. To decorate the front, I stamped the "love" heart in Rose Red on Whisper White then cut it out by hand and adhered it. The giant blue glitter U came in a pack of stuff I got in a Grab Bag from SU!'s online clearance rack. It's a chipboard letter and it was already covered with glue and had adhesive on the back so I just stuck it on and we're good to go!
Total time? About 5 minutes and that includes dealing with a 3-year-old who didn't want to stay in bed! :-)
Supply List
Stamps: Cute by the Inch (retired hostess set)
Cardstock: Rose Red, Whisper White
Ink: Rose Red
Accessories: Heart punch, chipboard letter
Monday, January 23, 2012
Sweetheart Treat Bag
We're only three weeks away from Valentine's Day! Every time holidays like this pop up, I realize how sorely I am lacking in stamps with appropriate sentiments. Guess it's time I work on building some sentiment stamps up in my collection, huh? This little treat bag is an easy way to dress up some conversation hearts. I used a 4"x4-1/2" square of Soft Suede and punched the ends using a decorative border punch. Then I folded it in half and attached it to the top of the bag with some brads. I threaded some of the Calypso Coral ribbon from the Everyday Enchantment Sale-A-Bration Ribbon & Brads pack (Sale-A-Bration starts TOMORROW!!!) and tied it in a bow. I used the coordinating paper and punched out four hearts using my large heart punch. I folded them in half and adhered them to one another to make the pop-up heart. Lastly, I made a little flag using the Amour stamp from Artistic Etchings. I may end up sending some of these off to daycare or maybe make some for my stamp club members and February hostesses!
Supply List
Stamps: Artistic Etching (page 129 of the IBC)
Cardstock: Soft Suede, Whisper White
Ink: Calypso Coral
Paper: Everyday Enchantment DSP (SAB 2012)
Accessories: Scallop trim border punch, full heart punch, Everyday Enchantment Ribbon & Brad pack, brads, cello bags, CANDY! :-)
Subscribe to:
Posts (Atom)