

Friday, April 27, 2012
One More Sketch
Thursday, April 26, 2012
Big Feet

Wednesday, April 25, 2012
Christmas Lights

Supply List
Stamps: Christmas Punch (retired hostess)
Cardstock: Whisper White, Real Red, Always Artichocke
Ink: Real Red, Daffodil Delight, Tempting Turquoise
Accessories: Scallop Oval punch, toddler
Tuesday, April 24, 2012
Two for Tuesday
 First up is a quick MDS card. This would be a simple card to make with supplies you have on hand. Just two layers, a stamp set, and an ink pad. This would also be pretty sas a diecut card with the Whisper White cut so the Island Indigo can peek through.
 Also finished the drawing I posted last night. I'm not crazy about the look of the right hand but I'm thrilled with how the jeans look!
 Monday, April 23, 2012
Unfinished was Good Enough for Picasso...

Sunday, April 22, 2012
Family Photos

Saturday, April 21, 2012
Buttons 'n' Brads

Friday, April 20, 2012
Wand Bling

The only problem? My son, husband, and I all wound up with the same wand. Normally they have about six styles to choose from, but the Pigeon Forge one was out of most and only had two styles in stock. I'm not really a gold person, I'd take silver any day, but the wand that had silver was also bright red and black with big lightning bolts on it - not my thing. So I went with this one since it was a bit more subtle and I knew I could dress it up. As fun as it is, MagiQuest is also a money sucker and they sell all kinds of decorative wand toppers and design kits so you can "customize" your wand. I'll customize my way, thanks. So I did some quick wire bead links, looped a band of gold wire around the wand, and attached my beads. It's a start and I think I'll add more as we go along and complete different things, but I like it so far.
Thursday, April 19, 2012
Racing with Grandpa

Another MDS project, using square punches to create a checkered flag border.
Wednesday, April 18, 2012
Love my boys
 Using some more vacation pictures and MDS for some fast scrapbooking spreads. Actually, both this and the project from yesterday are 5x7 postcards. So I could stick them in frames or put them on a bigger piece of cardstock if I want to put them in a scrapbook.
 Tuesday, April 17, 2012
Moms and their boys
 A little MDS collage with a couple of pictures from vacation last week. I always love browns and blues mixed together and the digital tape is such a fun enhancement to play with!
Monday, April 16, 2012
Baby Book
 One of the things you can create in MDS is a journal. You design the covers and the inside is filled with lined pages if you have it printed through SU!'s printing place. I designed this to be a baby journal for a new mother - a perfect place to jot down all those milestones.
 Saturday, April 7, 2012
Vacation!
Hey all, sorry I didn't post anything last night. It's early Saturday morning and my family and I are getting ready to head out on vacation for the week. I was so busy packing last night that I didn't get to do any crafting! We will be staying in the Smoky Mountains of Tennessee and the cabin we rented does not have internet, so the blog will be on hiatus this week. I still hope to do some crafting (or some MDS-ing, at least!) while we're gone, so I plan to come back with stuff to post and will do some doubling up until I'm back where I'm supposed to be. I hope you all have a wonderful Easter and I will see you in a week!
Thursday, April 5, 2012
MDS Quickie
 This is a quick one, because I spent most of the evening uninstalling and reinstalling my MDS on my laptop since I had a bunch of stamps go missing on it. The content on the discs didn't take that long, but I had to re-download updates, plus all of my purchased MDS stamps to get my laptop version matching my desktop version.
 Pretty simple stuff here - Island Indigo, Pool Party, and Whisper White.
Wednesday, April 4, 2012
Stamp Club Bookmark
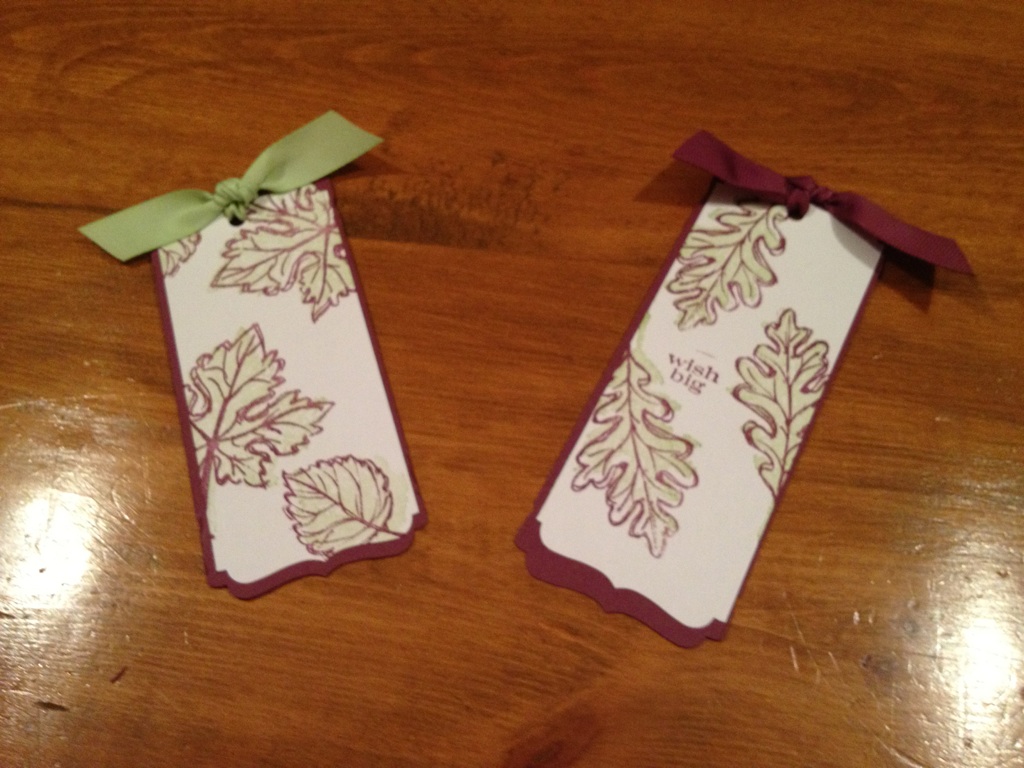 I actually took a couple projects from last week and combined them to to come up with these bookmarks for tonight's stamp club project. I swapped out a true violet for Rich Razzleberry which is a bit more red-violet.
Supply List
Stamps: Gently Falling (Holiday Mini 2011), Perfect Pennants
Cardstock: Whisper White, Rich Razzleberry
Ink: Certainly Celery, Rich Razzleberry
Accessories: Decorative Label punch, 5/8" Rich Razzleberry ribbon, 5/8" Certainly Celery ribbon
Tuesday, April 3, 2012
Finally
 Been trying to make this necklace for awhile. I love the way these green stones look with the small purple ones. I wanted to do a necklace in my typical style, using wire to string a few beads, make a loop at each end and loop it through the next piece. Unfortunately, the only wire I had that would fit through the purple beads was so thin that the loops wouldn't support each other. The easy solution to this would be wire wrapping, which is what I ended up doing at each end of the long strand by the clasp, but I'm not that good at wire wrapping yet. Hopefully I can get better with some more practice!
All of these stones came from the Smoky Mountains and I'm very excited to be going back there next week. We're not sure if the cabin we've rented has internet access, so the blog may be going on hiatus next week. Hopefully I'll get some crafting done on my vacation, but if not, I'll double up on posts and projects until I catch up.
Monday, April 2, 2012
Down the Bunny Hole
 I totally cannot take credit for this card, I've seen several examples of it all over the net. The problem is that it requires multiple oval punches that I don't have. So once again, I turn to MDS, where I can resize a punch as much as I need to!
 To make the tree, I made the entire background Early Espresso, then I added an oval punch in Baja Breeze and sized it up so it would go off the edge. The hole in the tree and the bunny's butt are both circles, as are the toes which I had to size way down. Finally the tail is a scallop circle. If I made this card traditionally, I'd probably pull the end off a q-tip to make the tail so it would have a 3D element.
Sunday, April 1, 2012
No foolin', just Bliss
 I will start off by saying that I don't like how these circles look. I wanted to use some of my other circle punches but I loaned them and haven't gotten them back yet, which keeps throwing me off as I get deep into a card, reach for a punch and it's not there! LOL
This was inspired by a card I saw on Stampin' Connection, the only difference is the other card was squares instead of circles.
Supply List
Stamps: Bliss (SAB 2011)
Cardstock: Whisper White, Island Indigo
Ink: Island Indigo
Accessories: 1" circle punch, 1-1/4" circle punch
Subscribe to:
Comments (Atom)