

Thursday, July 19, 2012
More Classroom Fun
Birthday invitations and lesson plans, oh my!


Friday, July 6, 2012
Happy You times Three
If you're a stamper, or even a crafter in general, you're probably familiar with the term "CASE." CASE stands for Copy And Share Everything (although some people substitute Steal for Share!) A lot of the projects on this blog, while they haven't been straight CASEs, have definitely been inspired or influenced by other projects in the blog-o-sphere. Well, last week, as I was prepping for my July stamp club (the Peek-A-Baby card), I decided I wanted to use Happy You, a new hostess set. Unfortunately, I couldn't find a lot of examples of cards with that set. The Peek-A-Baby was pretty original for me, although parts of it were undoubtedly influenced by other cards I've seen. I wanted to create some other note cards with Happy You today, because it's a great starter stamp set - there's something in it for everything. So I just sat down with the set, some cardstock and markers and here's what I came up with.
 This was actually the last card I did. I had wanted to make an umbrella a while back and failed miserably at my overachieving punch design. So I kept it simpler this time and used the ornament punch to make the shape of the umbrella. I used a 3/4" circle punch to make the scallops at the bottom. I free-hand cut the handle. For the boots, I colored just the boot image with my black marker and stamped it three times. Then I colored the complete image and stamped it again on the Baja Breeze. I restamped just the boot on Raspberry Ripple and cut it out and adhered it over the original image. I added the white polka dots with my white gel pen. The flowers are colored with Raspberry Ripple, Primrose Petals, and Gumball Green. Some of the pearls and a knot of ribbon on the handle were the last touches I added.
 This was the card that started my day and led to the paper piecing on all the projects. (Paper piecing is stamping your image on colored paper, cutting it out and laying it overtop of the same stamped image on your background. Nice pop of color without having to color in everything by hand and a great use of scraps.) I started with the Baja Breeze background and made the clouds but punching a scalloped oval, using the opening as a template, and sponging white through it. Then I stamped the kites randomly. For the kites, I used the 2011-2013 In Colors. The kites are attached with dimensionals which is why there's such deep shadows under them.


Merry Christmas in July! Don't be surprised if more than a few Christmas projects pop up this month because a)I'm behind on them and b)July is when I really get into a Christmas mood and start planning my holiday cards and gifts. This little wreath image in the Happy You stamp set is pretty but small, so I wanted to make it stand out. I began by cutting rectangle out of Early Espresso and I used my scoring board to create the panels to make a rectangle. Then I stamped the wreath five times on a piece of Gumball Green using Garden Green ink. To speed the cutting process, I punched them out with the 1-1/4" circle punch and punched the center with the 1/2" circle. That made cutting around all the leaves a lot faster. I left one wreath whole and cut the others in half. I wound up only using 3 1/2 wreaths - one on the center of the door and 2 1/2 to make the garland. The last things were the red bow on the door wreath and using the white gel pen to create the berries.
Supply List
Stamps: Happy You
Cardstock: Raspberry Ripple, Gumball Green, Baja Breeze (rainboots card), Whisper White, Baja Breeze, Pool Party, Island Indigo, Lucky Limeade, Calypso Coral, Wisteria Wonder (kites card), Crumb Cake, Soft Suede, Early Espresso, Gumball Green (Christmas door card)
Ink: Basic Black, Garden Green, Raspberry Ripple, Primrose Petals, Gumball Green (marker form), Whisper White craft ink (clouds)
Accessories: Ornament punch, Basic Pearls, ribbon scraps, white gel pen (rainboots), scallop oval punch, sponge (kites), scoring board, Itty Bitty punch pack, ribbon scraps, 1/2" circle punch, 1-1/4" circle punch (Christmas door)
Sunday, July 1, 2012
Soft, cuddly, elephant-ness

This little guy took me about a week. I don't typically mind crocheting in the round, but this pattern uses a continuous round or a spiral, instead of separate round rows. When I do this again, I think I'll make the rows separate. It's easier for me to follow and will make it easier to attach the legs at the end. I had to reattach the left leg twice because I just couldn't get it lined up with the right, even though I was in the "same" row. I may also try going up a hook size or two. Because of the stuffing, I had to keep the stitches really tight, which got to be kind of tortuous on my hands after awhile. And the tight stitches combined with rounds that were only 8 stitches to begin with on such a small hook made it almost impossible to hold! LOL Overall though, I'm pretty pleased with how it came out and he's got a little place of honor sitting on my Big Shot shelf.
Friday, June 29, 2012
Peek-A-Baby!

Supply List
Stamps: Happy You
Cardstock: Very Vanilla, Gumball Green, Daffodil Delight
Inks: Basic Black, Cajun Craze, Gumball Green, Daffodil Delight (all in marker form)
Accessories: 1-1/4", 1-3/8", small scallop circle punches, Adorning Accents edgelilts, Daffodil Delight 5/8" grosgrain ribbon
Saturday, June 23, 2012
For Abigail

Sunday, June 17, 2012
Father's Day Goodies
Just wanted to share what my son and I created for my husband for Father's Day.
 The other night, my son and I wandered around our neighborhood to find some good photo opportunities. We took along two pieces of cardstock and a black Sharpie and I wrote the letter d on one and the letter a on the other. I took a series of photos of him in various spots holding each sign. Once we got home, I uploaded them all and used Walgreen's photo site to create two 5x7 photo collages where I arranged the photos to spell out dad. I did absolutely zero editing to the photos besides changing some to black and white. I love Walgreen's photo services - they almost always have a coupon code and it winds up being just as cheap as printing them yourself. While at Walgreen's to pick them up, I also found these gorgeous matted shadowbox frames to use for the pictures and they were only $5.
 In addition to these two prints, I also have a large 11x14 collage of my favorite three shots that will be coming later this week. My local Walgreen's doesn't have the equipment to print that big in store.
 Of course, in this house, no gift is complete without a card and I had my son help with that too. Using just a cheap set of watercolors, I painted the bottom of his feet and had him step on a piece of cardstock. The watercolor washed right off with no staining, but still left a good impression of his foot. I wanted to use a recordable card SU! had available for awhile. It's a 4 1/4x5 1/2 card and my son's foot is now bigger than that! So I had to make the card front a little bigger than the inside. I trimmed off as much as I could, although part of his other foot is still visible as well as a misplaced toe, but I kind of like how it balances out the card. I mounted it on a piece of Pacific Point and attached that to the front of the card.
 Once my son recorded a message of "Happy Father's Day!" I printed out this poem that I saw on a project kit in Oriental Trading and attached that to the inside. The punched start marks where you need to push to make the recording play. You can see some of the speaker and buttons through the white paper but I didn't want to put anything too heavy over it and mess up the sound.


Saturday, June 2, 2012
Welcome June!
Again, I'm making NO promises for how frequent I'll be posting over the next few weeks. We're down to the last two weeks of school and I know they're going to be super busy. In fact, I know I have something school-related going on just about every night in this upcoming week. Hopefully, once school is over, I'll have a bit more time for crafting, but we'll see since I'll also have my little monster home with me full time for the summer.
 Speaking of my little monster, here's a little something he and I created last weekend. He loves all animals and has just been itching to paint something, so I picked up this little birdhouse for him. For the birdhouse and the paint, I spent a whopping $4, my son had a blast painting it, and exclaims "There's my red birdhouse!" every time we pull into our yard. Doesn't get much better.
 In case you haven't noticed, Stampin' Up!'s new catalog just launched yesterday! You can click the link over there on the right to view all the new goodies for yourself. I think it's one of the prettiest catalogs we've had since I became a demonstrator four years ago. And I'm just tickled by this hostess set, Carry On. The dark blue in the center is Midnight Muse, one of SU!'s new In Colors for 2012-2014. I mixed it with Calypso Coral and Pool Party, two of the 2011-2013 In Colors. I also used the new Bitty Banners die for the Big Shot to emphasize the "and" in the middle of the sign. This was my stamp club card for June.
 During stamp club, I changed it up and made a variation while I demo'd how to make the card. I also moved the layout around a little bit. I honestly can't decide which way I like it better!
 And for one more fun card before I go...I found a quilt with a similar design to this on Pinterest. The quilt was also made with strips of black and white fabric. I made this card using some scraps I have leftover from Night & Day, a DSP SU! had available a few years ago. I love love love the designs on this paper and wish it would come back! I cut the paper into 1/2" wide strips. I used a 3 3/4"x 5" scrap of white cardstock and ran it through my Xyron to completely coat it with adhesive. Once all the strips were stuck on, I trimmed off the edges with my paper cutter, added the ribbon and flower, then mounted it on black before attaching it to a piece of Tempting Turquoise cardstock. I may try this again with some other colors of paper.


Wednesday, May 16, 2012
M.I.A.
In the last couple of days, a few people have either asked when I'm going to update this blog or simply pointed out how slack I've been where updates are concerned. My main response was surprise and shock that anybody had noticed. There are a million excuses I could give, none of which are very good, but I got lazy at the very end of April over the weekend of my birthday, then I just enjoyed the quiet peacefulness of spending the evenings with my family instead of stressing over what I would create for the blog.
That's not to say I haven't been getting my craft on over the last couple of weeks. I've discovered the website Ravelry, which is a knitting/crocheting community, filled with oodles of patterns for practically anything you can think of. So my evenings as of late have been spent with my family and my crochet hooks. Here are some examples of what I've been up to...
 This is a ruffle scarf I made out of some leftover yarn from a baby afghan I made a couple years ago. Since it was baby yarn, it's super soft, warm and snuggly.
 I found a pattern for this headband on Ravelry and loved the look of it. I've modified mine slightly though. In the original design, the headband was meant to tie in the back, under the hair. I hate headbands that do that because I have such thin, fine hair that I always wind up with a bump sticking out at the base of my neck. So I played around and used some single crochet stitches to hold the bands together at the bottom and it's hidden by my hair but lies flat against my head. Meanwhile, the original design of the flower had an extra row of double crochets in the center so it was HUGE -like the size of my entire head. I couldn't handle that, so I knocked out that row and readjusted the measurements to make it fit.
 Isn't this the cutest little thing? It's a Chapstick holder! What a great and useful little way to use up scraps of yarn and spare buttons. Notice I used a Stampin' Up! button!
 I haven't completely ignored my paper crafting. These are the boxes we created at my May stamp club a couple weeks ago. This is the last month of the current Stampin' Up! catalog, so we made these out of retiring cardstock and stamps. The boxes actually fold up just like a pizza box. I added the belly bands for a little pizzazz.
 These little pouches are what started my crochet kick. I needed a little case to carry my phone around in school without it being obvious on the days I wear clothes without pockets. So I found a couple of different patterns online to try. So far, I think the one on the left is my favorite. I may try a few more though before deciding for sure, just because I'm having so much fun!
That's not to say I haven't been getting my craft on over the last couple of weeks. I've discovered the website Ravelry, which is a knitting/crocheting community, filled with oodles of patterns for practically anything you can think of. So my evenings as of late have been spent with my family and my crochet hooks. Here are some examples of what I've been up to...


Friday, April 27, 2012
One More Sketch

Thursday, April 26, 2012
Big Feet

Wednesday, April 25, 2012
Christmas Lights

Supply List
Stamps: Christmas Punch (retired hostess)
Cardstock: Whisper White, Real Red, Always Artichocke
Ink: Real Red, Daffodil Delight, Tempting Turquoise
Accessories: Scallop Oval punch, toddler
Tuesday, April 24, 2012
Two for Tuesday
 First up is a quick MDS card. This would be a simple card to make with supplies you have on hand. Just two layers, a stamp set, and an ink pad. This would also be pretty sas a diecut card with the Whisper White cut so the Island Indigo can peek through.
 Also finished the drawing I posted last night. I'm not crazy about the look of the right hand but I'm thrilled with how the jeans look!
 Monday, April 23, 2012
Unfinished was Good Enough for Picasso...

Sunday, April 22, 2012
Family Photos

Saturday, April 21, 2012
Buttons 'n' Brads

Friday, April 20, 2012
Wand Bling

The only problem? My son, husband, and I all wound up with the same wand. Normally they have about six styles to choose from, but the Pigeon Forge one was out of most and only had two styles in stock. I'm not really a gold person, I'd take silver any day, but the wand that had silver was also bright red and black with big lightning bolts on it - not my thing. So I went with this one since it was a bit more subtle and I knew I could dress it up. As fun as it is, MagiQuest is also a money sucker and they sell all kinds of decorative wand toppers and design kits so you can "customize" your wand. I'll customize my way, thanks. So I did some quick wire bead links, looped a band of gold wire around the wand, and attached my beads. It's a start and I think I'll add more as we go along and complete different things, but I like it so far.
Thursday, April 19, 2012
Racing with Grandpa

Another MDS project, using square punches to create a checkered flag border.
Wednesday, April 18, 2012
Love my boys
 Using some more vacation pictures and MDS for some fast scrapbooking spreads. Actually, both this and the project from yesterday are 5x7 postcards. So I could stick them in frames or put them on a bigger piece of cardstock if I want to put them in a scrapbook.
 Tuesday, April 17, 2012
Moms and their boys
 A little MDS collage with a couple of pictures from vacation last week. I always love browns and blues mixed together and the digital tape is such a fun enhancement to play with!
Monday, April 16, 2012
Baby Book
 One of the things you can create in MDS is a journal. You design the covers and the inside is filled with lined pages if you have it printed through SU!'s printing place. I designed this to be a baby journal for a new mother - a perfect place to jot down all those milestones.
 Saturday, April 7, 2012
Vacation!
Hey all, sorry I didn't post anything last night. It's early Saturday morning and my family and I are getting ready to head out on vacation for the week. I was so busy packing last night that I didn't get to do any crafting! We will be staying in the Smoky Mountains of Tennessee and the cabin we rented does not have internet, so the blog will be on hiatus this week. I still hope to do some crafting (or some MDS-ing, at least!) while we're gone, so I plan to come back with stuff to post and will do some doubling up until I'm back where I'm supposed to be. I hope you all have a wonderful Easter and I will see you in a week!
Thursday, April 5, 2012
MDS Quickie
 This is a quick one, because I spent most of the evening uninstalling and reinstalling my MDS on my laptop since I had a bunch of stamps go missing on it. The content on the discs didn't take that long, but I had to re-download updates, plus all of my purchased MDS stamps to get my laptop version matching my desktop version.
 Pretty simple stuff here - Island Indigo, Pool Party, and Whisper White.
Wednesday, April 4, 2012
Stamp Club Bookmark
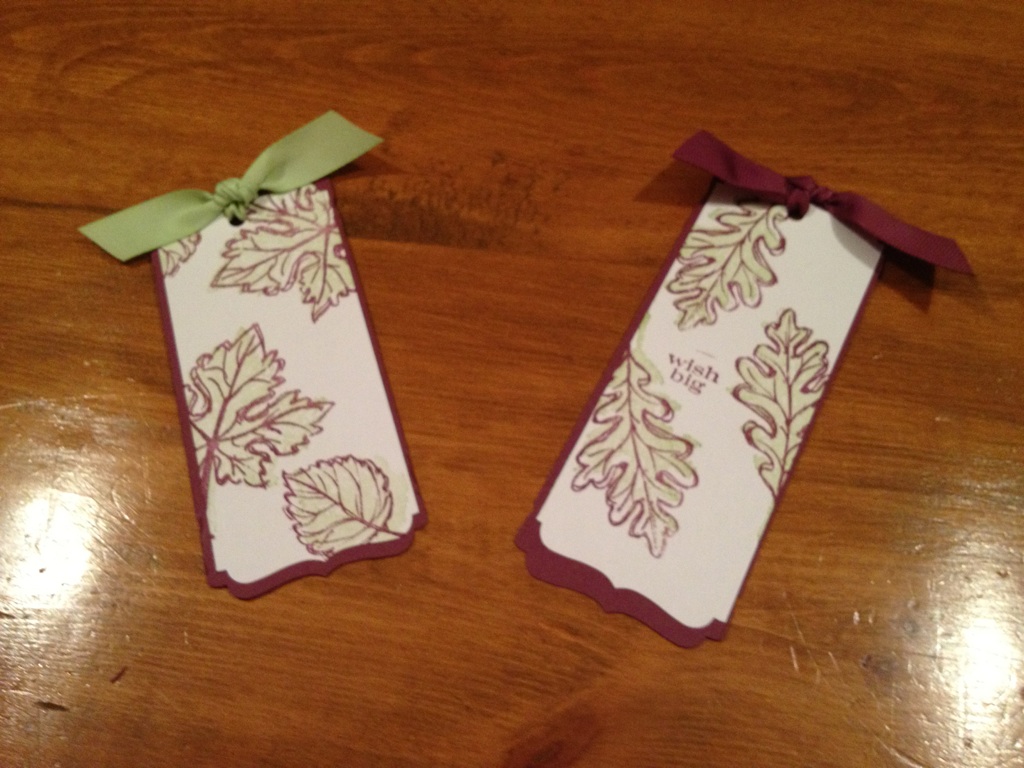 I actually took a couple projects from last week and combined them to to come up with these bookmarks for tonight's stamp club project. I swapped out a true violet for Rich Razzleberry which is a bit more red-violet.
Supply List
Stamps: Gently Falling (Holiday Mini 2011), Perfect Pennants
Cardstock: Whisper White, Rich Razzleberry
Ink: Certainly Celery, Rich Razzleberry
Accessories: Decorative Label punch, 5/8" Rich Razzleberry ribbon, 5/8" Certainly Celery ribbon
Tuesday, April 3, 2012
Finally
 Been trying to make this necklace for awhile. I love the way these green stones look with the small purple ones. I wanted to do a necklace in my typical style, using wire to string a few beads, make a loop at each end and loop it through the next piece. Unfortunately, the only wire I had that would fit through the purple beads was so thin that the loops wouldn't support each other. The easy solution to this would be wire wrapping, which is what I ended up doing at each end of the long strand by the clasp, but I'm not that good at wire wrapping yet. Hopefully I can get better with some more practice!
All of these stones came from the Smoky Mountains and I'm very excited to be going back there next week. We're not sure if the cabin we've rented has internet access, so the blog may be going on hiatus next week. Hopefully I'll get some crafting done on my vacation, but if not, I'll double up on posts and projects until I catch up.
Monday, April 2, 2012
Down the Bunny Hole
 I totally cannot take credit for this card, I've seen several examples of it all over the net. The problem is that it requires multiple oval punches that I don't have. So once again, I turn to MDS, where I can resize a punch as much as I need to!
 To make the tree, I made the entire background Early Espresso, then I added an oval punch in Baja Breeze and sized it up so it would go off the edge. The hole in the tree and the bunny's butt are both circles, as are the toes which I had to size way down. Finally the tail is a scallop circle. If I made this card traditionally, I'd probably pull the end off a q-tip to make the tail so it would have a 3D element.
Sunday, April 1, 2012
No foolin', just Bliss
 I will start off by saying that I don't like how these circles look. I wanted to use some of my other circle punches but I loaned them and haven't gotten them back yet, which keeps throwing me off as I get deep into a card, reach for a punch and it's not there! LOL
This was inspired by a card I saw on Stampin' Connection, the only difference is the other card was squares instead of circles.
Supply List
Stamps: Bliss (SAB 2011)
Cardstock: Whisper White, Island Indigo
Ink: Island Indigo
Accessories: 1" circle punch, 1-1/4" circle punch
Saturday, March 31, 2012
For Sam
 Of course, I can't give a gift without a fabulous card so I came up with this to celebrate the show tonight. To make the spotlights, I used some gold cardstock and cut it into a 1-1/8" strip, then used my 1-1/4" circle punch to round the edges. For the beams of light, I cut some of the sparkly vellum I used on the Christmas cup earlier this week into triangular strips, then cut it down to fit inside of the lights and on the card front. I punched out the name with a Big Shot die and punched the stars to cover where my adhesive showed through the vellum. I'm very pleased with the results on this one!
Supply List
Cardstock: Melon Mambo, Basic Black, Metallic Gold
Paper: Non-SU! vellum
Accessories: Big Shot, alphabet die, small star punch, 1-1/4" circle punch
Friday, March 30, 2012
Showstopper
 A former student of mine attends our local governor's school for the performing arts. She is a senior and has a starring role in the school's spring musical. This weekend is one of the final times she'll take the stage as a student of this school and we'll be attending the performance tomorrow night. She's like a daughter to me and we're pretty close to the entire family - her mother works with me and my husband, and her uncle is our insurance agent! So I had to do something special for her to give to her at the performance tomorrow night. I wanted to make something with stars or musical notes but, of course, I didn't have any of those in my 8000 tons of beads that are around.
 I did have these flower beads though and combined them with the crackled white and clear crystal beads. I like the shimmery overall effect and it's neutral enough that it could be worn with just about anything!
Thursday, March 29, 2012
Boxes Boxes
 You can never have too many boxes. I'm one of those people who loves to put stuff inside of boxes. I have so many little boxes, caddies, and tins on and in my desk at work and at home to hold all those little odds and ends.
 This is a quick and easy box made using the Scallop Envelope die for the Big Shot. I cut out four envelopes and folded them on the score lines. The fancy scalloped edge got folded to the outside for contrast and all the other pieces were folded in. I cut off the side tabs on two of the envelopes, then used the tabs on the other two envelopes to attach the envelopes around the side to make a square. Then I overlapped the big flaps on the bottom. Depending on the paper you use, these could make very quick little Easter baskets. You can attach a strip of paper or some ribbon to make a handle.
Supply List
DSP: Tall Tales (retired)
Accessories: Big Shot, Scallop Envelope die
Wednesday, March 28, 2012
Flame Flowers
 So here's another example of something that started out completely different from how it ended. I wanted to use the flowers and the shadows to evoke a look of flames. It didn't really create the look I wanted, but I still liked the look of the flower punches stacked on top of each other. I used Daffodil Delight for the flowers and Peach Parfait for the shadows. A strip of ribbon, a sentiment, and a quick and easy card.
Tuesday, March 27, 2012
More Green & Purple
 Had to play with this color combo some more. I don't have a lot of Wild Wasabi embellishments in my MDS, so I had to switch to Certainly Celery for this one. The stamp brush set is called Always. For the bird, I stamped it in Perfect Plum, then gave it a drop shadow in Certainly Celery. I upped the opacity to around 75% and set the blur around a 2.
 Monday, March 26, 2012
Hello
 Purple and green is one of those weird color combos that works much better than it seems like it should! I have a roll of Christmas ribbon that is silver with purple and green trees that I just adore. The colors perfectly match Perfect Plum and Wild Wasabi. The ribbon is almost gone, so I'm pretty much hoarding it at this point, saving it for that perfect card for the perfect person! LOL
Supply List
Stamps: Gently Falling (2011 Holiday mini), Pennant Parade
Cardstock: Wild Wasabi, Perfect Plum, Very Vanilla
Ink: Wild Wasabi, Perfect Plum
Sunday, March 25, 2012
Christmas Craft is here!
 Sometimes things definitely look a lot better in my imagination! I found this plastic wine goblet on clearance a few weeks ago and picked it up, thinking I could do SOMEthing with it. So a couple days ago, I was digging through my vellum when I found this vellum with the white snowbursts in it and decided to use that in my cup for a Christmas craft. I tore it into pieces and used Modge Podge to apply it to the inside of the cup. I guess the vellum was a little darker than I realized, especially when layered. Still, I think this will be pretty with a battery operated tea light inside of it. Hard to see in the picture but the ribbon has silver sparkly snowflakes on it.
Supply List
Plastic cup, Modge Podge, vellum, ribbon
Saturday, March 24, 2012
Saturday Night Twofer
 Yep, I know I missed last night. For the third Friday in a row, we had free tickets to Arena Racing USA in Richmond. That means we get home for work, change, throw some snacks and juice boxes in a bag for the boy, and head to Richmond. The races last for about 3 hours and we got home at midnight. The last two Fridays, I was able to post stuff I had made in my classroom during the day, but I spent all of my free time yesterday coming up with a new application for my yearbook staff applicants. So technically I did create SOMETHING. :-)
I went ahead and made two goodies for today to make up for yesterday. The first thing I made was the card. I love this stamp set, Trendy Trees. I got the idea for the box around the stamped image from another card I saw online. I drew the lines freehand, using a scrap of cardstock as a "ruler" but I didn't want my lines completely uniform.
The second thing I made was the bookmark. I've seen a lot of demonstrators using their punches in ways I hadn't thought of, by pulling only part of the cardstock through the punch. I used the decorative label punch to make the fancy edges of the bookmark.
Supply List
Stamps: Trendy Trees, Pines and Poinsettias (2011 Holiday Mini)
Cardstock: Pretty In Pink, Wild Wasabi, Very Vanilla
Ink: Pretty In Pink, Wild Wasabi, Soft Suede (I used markers since these were small images)
Accessories: Decorative Label punch, Chocolate Chip scalloped polka dot ribbon, stapler
Subscribe to:
Comments (Atom)